Automation Tests with Page Object Model, Selenium and Cucumber

I will write automation tests for gmail login . In this example, I will integrate Selenium and Cucumber using Page Object Mode.

Cucumber is an open source tool, which supports behavior driven development.  We can say that Cucumber is a testing framework driven by plain English text.

Page Object Model helps testing code more maintainable and remove duplication code.


Create maven project

and add required dependencies : junit, Selelium and Cucumber.

pom.xml

</pre>
<project xmlns="http://maven.apache.org/POM/4.0.0" xmlns:xsi="http://www.w3.org/2001/XMLSchema-instance"

<project xmlns="http://maven.apache.org/POM/4.0.0" xmlns:xsi="http://www.w3.org/2001/XMLSchema-instance" xsi:schemaLocation="http://maven.apache.org/POM/4.0.0 http://maven.apache.org/xsd/maven-4.0.0.xsd"> <modelVersion>4.0.0</modelVersion>
<groupId>com.javacoffie</groupId>

<artifactId>testend2end</artifactId>

<version>0.0.1-SNAPSHOT</version>

<packaging>jar</packaging>
<name>testend2end</name>

<url>http://maven.apache.org</url>
<properties> <project.build.sourceEncoding>UTF-8</project.build.sourceEncoding> <cucumber.version>1.2.5</cucumber.version> <maven.compiler.target>1.8</maven.compiler.target> <maven.compiler.source>1.8</maven.compiler.source> </properties>
<dependencies>
<dependency>

<groupId>org.seleniumhq.selenium</groupId>

<artifactId>selenium-java</artifactId>

<version>3.6.0</version>

</dependency>
<dependency>

<groupId>info.cukes</groupId>

<artifactId>cucumber-junit</artifactId>

<version>${cucumber.version}</version>

<scope>test</scope>

</dependency>
<dependency> <groupId>info.cukes</groupId>

<artifactId>cucumber-core</artifactId>

<version>${cucumber.version}</version>

</dependency>
<dependency> <groupId>info.cukes</groupId>

<artifactId>cucumber-java</artifactId>

<version>${cucumber.version}</version>

</dependency>
<dependency> <groupId>junit</groupId>

<artifactId>junit</artifactId>

<version>4.12</version>

<scope>test</scope> </dependency>

</dependencies></project>

Create java class BasePage


public class BasePage {

protected WebDriver driver;

public BasePage(WebDriver driver) { 

this.driver = driver;

PageFactory.initElements(driver, this); 

}

public LoginPage navigateTo() {

driver.navigate().to("gmail.com");

assertEquals("test app", driver.getTitle());
driver.manage().window().maximize(); 

return new LoginPage(driver); }

}

create Login Page


import static org.junit.Assert.assertEquals;

import static org.junit.Assert.assertEquals;
import java.util.Arrays;
import org.openqa.selenium.WebDriver;

import org.openqa.selenium.WebElement;

import org.openqa.selenium.support.FindBy;
import org.openqa.selenium.support.How;
import org.openqa.selenium.support.ui.ExpectedConditions;
import org.openqa.selenium.support.ui.WebDriverWait;
public class LoginPage extends BasePage {

@FindBy(how = How.XPATH, xpath = USERNAME_INPUT_XPATH)
private WebElement usernameInputElement;
@FindBy(how = How.XPATH, xpath = PASSWORD_INPUT_XPATH)
private WebElement passwordElement;
@FindBy(how = How.XPATH, xpath = LOGIN_BUTTON_XPATH)
private WebElement login;
public LoginPage(WebDriver driver) {
   super(driver);
}

public HomePage login(String username, String password) {
  usernameInputElement.sendKeys(username);
  passwordElement.sendKeys(password);
  login.click();
  return new HomePage(driver);
}


create Home Page


public class HomePage extends BasePage {

 @FindBy(how = How.XPATH, xpath = MAIL_PANEL)
private WebElement mailPanel;

@FindBy(how = How.XPATH, xpath = LoginLabel)
private WebElement loginNameLabel;
public HomePage (WebDriver driver) {
      super(driver);
 }
 public void verifyLogin(String loginName) {
WebDriverWait wait = new WebDriverWait(driver, 10); // check home page
wait.until(ExpectedConditions .visibilityOfAllElements(Arrays.asList(loginNameLabel, mailPanel)));
wait.until(ExpectedConditions.textToBePresentInElement(loginNameLabel, loginName));
}
}

Now, we separate view layer to tests. if pages are changed, we don’t need to change the tests, just change Page Objects internally.

In Resource folder, create feature file. logic.feature


Scenario: Successfully logging in
Given I navigate app
When enter user id and enter password
Then I go to the mail app with mail panel


Create new java class file end with Test: LoginRunnerClassTest


@RunWith(Cucumber.class)
@CucumberOptions( features="src/test/resources/features/account.feature", format ={"pretty", "html:target/Reports"})
public class AccountRunnerClassTest {
}

Run as junit test:

The error log shown:


You can implement missing steps with the snippets below:

@Given("^I navigate app$")
public void i_navigate_app() throws Throwable {
 // Write code here that turns the phrase above into concrete actions
 throw new PendingException();
}

@When("^enter user id and enter password$")
public void enter_user_id_and_enter_password() throws Throwable {
 // Write code here that turns the phrase above into concrete actions
 throw new PendingException();
}

@Then("^I go to the mail app with mail panel$")
public void i_go to_the_mail_app_with_mail_panel() throws Throwable {
 // Write code here that turns the phrase above into concrete actions
 throw new PendingException();
}

create new java class LoginSteps: copy those code snippet above


public class LoginSteps {

 private static WebDriver driver = null;&amp;amp;nbsp;

 private LoginPage loginPage;&amp;amp;nbsp;

private HomePage homePage;

@Before

 public void startUp() {

//make sure you download chrome driver and copy to resource folder.

 System.setProperty("webdriver.chrome.driver", "src/main/resources/chromedriver.exe");&amp;amp;nbsp;

 driver = new ChromeDriver();

loginPage = new LoginPage(driver);
 }
 @After
 public void tearDown() {
 driver.quit(); 
}

 @Given("^I navigate app$") 
public void i_navigate_app() throws Throwable { 
loginPage .navigateTo();
}

@When("^enter user id and enter password$")
 public void enter_user_id_and_enter_password() throws Throwable { 
loginPage.login("example@gmail.com", "javacoffie1@"); 
}

@Then("^I go to the mail app with mail panel$")
 public void i_go to_the_mail_app_with_mail_panel() throws Throwable { 
homepage.verfiyLogin("example@gmail.com");
}

Now, you can execute the test from command line.


mvn clean test

That ‘s it. Happy coding.


Understanding and using CORS

Cross-Origin Resource Sharing (CORS) is a W3C spec that allows cross-domain communication from the browser. By building on top of the XMLHttpRequest object, CORS allows developers to work with the same idioms as same-domain requests.

Making a CORS Request

This section shows how to make a cross-domain request in JavaScript.

Creating the XMLHttpRequest object

CORS is supported in the following browsers:

  • Chrome 3+
  • Firefox 3.5+
  • Opera 12+
  • Safari 4+
  • Internet Explorer 8+

(see the complete list of supported browsers at http://caniuse.com/#search=cors)

Chrome, Firefox, Opera and Safari all use the XMLHttpRequest2 object. Internet Explorer uses the similar XDomainRequest object, which works in much the same way as its XMLHttpRequest counterpart, but adds additional security precautions. To get started, you will first need to create the appropriate request object

function createCORSRequest(method, url) {
 var xhr = new XMLHttpRequest();
 if ("withCredentials" in xhr) {

 // Check if the XMLHttpRequest object has a "withCredentials" property.
 // "withCredentials" only exists on XMLHTTPRequest2 objects.
 xhr.open(method, url, true);

 } else if (typeof XDomainRequest != "undefined") {

 // Otherwise, check if XDomainRequest.
 // XDomainRequest only exists in IE, and is IE's way of making CORS requests.
 xhr = new XDomainRequest();
 xhr.open(method, url);

 } else {

 // Otherwise, CORS is not supported by the browser.
 xhr = null;

 }
 return xhr;
}

var xhr = createCORSRequest('GET', url);
if (!xhr) {
 throw new Error('CORS not supported');
}


Event handlers

The original XMLHttpRequest object had only one event handler, onreadystatechange, which handled all responses. Although onreadystatechange is still available, XMLHttpRequest2 introduces a bunch of new event handlers. Here is a complete list

Event Handler Description
onloadstart* When the request starts.
onprogress While loading and sending data.
onabort* When the request has been aborted. For instance, by invoking the abort() method.
onerror When the request has failed.
onload When the request has successfully completed.
ontimeout When the author specified timeout has passed before the request could complete.
onloadend* When the request has completed (either in success or failure).

For most cases, you will at the very least want to handle the onload and onerrorevents:

xhr.onload = function() {
 var responseText = xhr.responseText;
 console.log(responseText);
 // process the response.
};

xhr.onerror = function() {
 console.log('There was an error!');
};

Browers don’t do a good job of reporting what went wrong when there is an error. For example, Firefox reports a status of 0 and an empty statusText for all errors. Browsers also report an error message to the console log, but this message cannot be accessed from JavaScript. When handling onerror, you will know that an error occurred, but not much else.

withCredentials

Standard CORS requests do not send or set any cookies by default. In order to include cookies as part of the request, you need to set the XMLHttpRequest’s .withCredentials property to true:

</pre>
<pre class="prettyprint"><span class="pln">xhr</span><span class="pun">.</span><span class="pln">withCredentials </span><span class="pun">=</span> <span class="kwd">true</span><span class="pun">;</span></pre>
<pre>


In order for this to work, the server must also enable credentials by setting the Access-Control-Allow-Credentials response header to “true”. See the server section for details.

</pre>
<pre class="prettyprint"><span class="typ">Access</span><span class="pun">-</span><span class="typ">Control</span><span class="pun">-</span><span class="typ">Allow</span><span class="pun">-</span><span class="typ">Credentials</span><span class="pun">:</span> <span class="kwd">true</span></pre>
<pre>


The .withCredentials property will include any cookies from the remote domain in the request, and it will also set any cookies from the remote domain. Note that these cookies still honor same-origin policies, so your JavaScript code can’t access the cookies from document.cookie or the response headers. They can only be controlled by the remote domain.

Making the request

Now that your CORS request is configured, you are ready to make the request. This is done by calling the send() method:


</pre>
<pre class="prettyprint"><span class="pln">xhr</span><span class="pun">.</span><span class="pln">send</span><span class="pun">();</span></pre>
<pre>

Adding CORS support to the server

Most of the heavy lifting for CORS is handled between the browser and the server. The browser adds some additional headers, and sometimes makes additional requests, during a CORS request on behalf of the client. These additions are hidden from the client

cors_flow


Browser manufacturers are responsible for the browser-side implementation

Types of CORS requests

Cross-origin requests come in two flavors:

  1. simple requests
  2. “not-so-simple requests” (a term I just made up)

Simple requests are requests that meet the following criteria:

  • HTTP Method matches (case-sensitive) one of:
    • HEAD
    • GET
    • POST
  • HTTP Headers matches (case-insensitive):
    • Accept
    • Accept-Language
    • Content-Language
    • Last-Event-ID
    • Content-Type, but only if the value is one of:
      • application/x-www-form-urlencoded
      • multipart/form-data
      • text/plain

Simple requests are characterized as such because they can already be made from a browser without using CORS. For example, a JSON-P request can issue a cross-domain GET request. Or HTML could be used to do a form POST.

Any request that does not meet the criteria above is a not-so-simple request, and requires a little extra communication between the browser and the server (called a preflight request), which we’ll get into below.

Handling a simple request

Lets start by examining a simple request from the client. The table below shows the JavaScript code for a simple GET request on the left, along with the actual HTTP request that the browser emits; CORS specific headers are in bold.

JavaScript:


<pre class="prettyprint"><span class="kwd">var</span><span class="pln"> url </span><span class="pun">=</span> <span class="str">'http://api.alice.com/cors'</span><span class="pun">;</span>
<span class="kwd">var</span><span class="pln"> xhr </span><span class="pun">=</span><span class="pln"> createCORSRequest</span><span class="pun">(</span><span class="str">'GET'</span><span class="pun">,</span><span class="pln"> url</span><span class="pun">);</span><span class="pln">
xhr</span><span class="pun">.</span><span class="pln">send</span><span class="pun">();</span></pre>

HTTP Request:

<pre class="prettyprint"><span class="pln">GET </span><span class="pun">/</span><span class="pln">cors HTTP</span><span class="pun">/</span><span class="lit">1.1</span>
<b><span class="typ">Origin</span><span class="pun">:</span><span class="pln"> http</span><span class="pun">:</span><span class="com">//api.bob.com</span></b>
<span class="typ">Host</span><span class="pun">:</span><span class="pln"> api</span><span class="pun">.</span><span class="pln">alice</span><span class="pun">.</span><span class="pln">com
</span><span class="typ">Accept</span><span class="pun">-</span><span class="typ">Language</span><span class="pun">:</span><span class="pln"> en</span><span class="pun">-</span><span class="pln">US
</span><span class="typ">Connection</span><span class="pun">:</span><span class="pln"> keep</span><span class="pun">-</span><span class="pln">alive
</span><span class="typ">User</span><span class="pun">-</span><span class="typ">Agent</span><span class="pun">:</span> <span class="typ">Mozilla</span><span class="pun">/</span><span class="lit">5.0</span><span class="pun">...</span></pre>

The first thing to note is that a valid CORS request *always* contains an Origin header. This Origin header is added by the browser, and can not be controlled by the user. The value of this header is the scheme (e.g. http), domain (e.g. bob.com) and port (included only if it is not a default port, e.g. 81) from which the request originates; for example: http://api.alice.com.

The presence of the Origin header does not necessarily mean that the request is a cross-origin request. While all cross-origin requests will contain an Origin header, some same-origin requests might have one as well. For example, Firefox doesn’t include an Origin header on same-origin requests. But Chrome and Safari include an Origin header on same-origin POST/PUT/DELETE requests (same-origin GET requests will not have an Origin header). Here is an example of a same-origin request with an Origin header:

HTTP Request:

</pre>
<pre class="prettyprint"><span class="pln">POST </span><span class="pun">/</span><span class="pln">cors HTTP</span><span class="pun">/</span><span class="lit">1.1</span>
<span class="typ">Origin</span><span class="pun">:</span><span class="pln"> http</span><span class="pun">:</span><span class="com">//api.bob.com</span>
<span class="typ">Host</span><span class="pun">:</span><span class="pln"> api</span><span class="pun">.</span><span class="pln">bob</span><span class="pun">.</span><span class="pln">com</span></pre>
<pre>

The good news is that browsers don’t expect CORS response headers on same-origin requests. The response to a same-origin request is sent to user, regardless of whether it has CORS headers or not. However, if your server code returns an error if the Origin doesn’t match a list of allowed domains, be sure to include the origin the request comes from.

Here’s a valid server response; the CORS-specific headers are bolded


Access-Control-Allow-Origin: http://api.bob.com
Access-Control-Allow-Credentials: true
Access-Control-Expose-Headers: FooBar
Content-Type: text/html; charset=utf-8

All CORS related headers are prefixed with “Access-Control-“. Here’s some more details about each header.

Access-Control-Allow-Origin (required) – This header must be included in all valid CORS responses; omitting the header will cause the CORS request to fail. The value of the header can either echo the Origin request header (as in the example above), or be a ‘*’ to allow requests from any origin. If you’d like any site to be able to access your data, using ‘*’ is fine. But if you’d like finer control over who can access your data, use an actual value in the header.

Access-Control-Allow-Credentials (optional) – By default, cookies are not included in CORS requests. Use this header to indicate that cookies should be included in CORS requests. The only valid value for this header is true (all lowercase). If you don’t need cookies, don’t include this header (rather than setting its value to false).

The Access-Control-Allow-Credentials header works in conjunction with the withCredentials property on the XMLHttpRequest 2 object. Both these properties must be set to true in order for the CORS request to succeed. If .withCredentials is true, but there is no Access-Control-Allow-Credentials header, the request will fail (and vice versa).

Its recommended that you don’t set this header unless you are sure you want cookies to be included in CORS requests.

Access-Control-Expose-Headers (optional) – The XMLHttpRequest 2 object has a getResponseHeader() method that returns the value of a particular response header. During a CORS request, the getResponseHeader() method can only access simple response headers. Simple response headers are defined as follows:

  • Cache-Control
  • Content-Language
  • Content-Type
  • Expires
  • Last-Modified
  • Pragma

If you want clients to be able to access other headers, you have to use the Access-Control-Expose-Headers header. The value of this header is a comma-delimited list of response headers you want to expose to the client.

Handling a not-so-simple request

So that takes care of a simple GET request, but what if you want to do something more? Maybe you want to support other HTTP verbs like PUT or DELETE, or you want to support JSON using Content-Type: application/json. Then you need to handle what we’re calling a not-so-simple request.

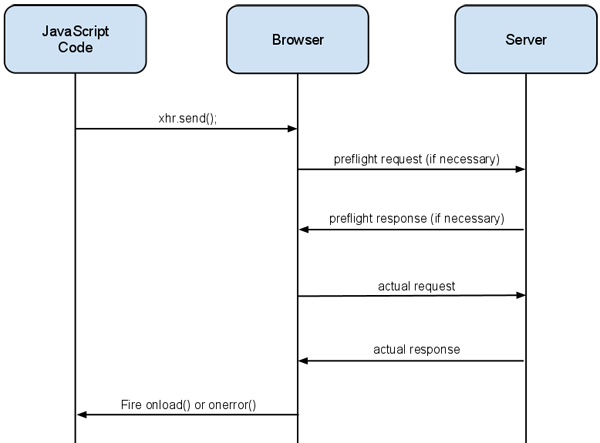
A not-so-simple request looks like a single request to the client, but it actually consists of two requests under the hood. The browser first issues a preflight request, which is like asking the server for permission to make the actual request. Once permissions have been granted, the browser makes the actual request. The browser handles the details of these two requests transparently. The preflight response can also be cached so that it is not issued on every request.

Here’s an example of a not-so-simple request:

JavaScript:

var url = 'http://api.alice.com/cors';
var xhr = createCORSRequest('PUT', url);
xhr.setRequestHeader(
    'X-Custom-Header', 'value');
xhr.send();

Preflight Request:

OPTIONS /cors HTTP/1.1
Origin: http://api.bob.com
Access-Control-Request-Method: PUT
Access-Control-Request-Headers: X-Custom-Header
Host: api.alice.com
Accept-Language: en-US
Connection: keep-alive
User-Agent: Mozilla/5.0...

Like the simple request, the browser adds the Origin header to every request, including the preflight. The preflight request is made as an HTTP OPTIONS request (so be sure your server is able to respond to this method). It also contains a few additional headers:

Access-Control-Request-Method – The HTTP method of the actual request. This request header is always included, even if the HTTP method is a simple HTTP method as defined earlier (GET, POST, HEAD).

Access-Control-Request-Headers – A comma-delimited list of non-simple headers that are included in the request.

The preflight request is a way of asking permissions for the actual request, before making the actual request. The server should inspect the two headers above to verify that both the HTTP method and the requested headers are valid and accepted.

If the HTTP method and headers are valid, the server should respond with the following:

Preflight Request:

OPTIONS /cors HTTP/1.1
Origin: http://api.bob.com
Access-Control-Request-Method: PUT
Access-Control-Request-Headers: X-Custom-Header
Host: api.alice.com
Accept-Language: en-US
Connection: keep-alive
User-Agent: Mozilla/5.0...

Preflight Response:

Access-Control-Allow-Origin: http://api.bob.com
Access-Control-Allow-Methods: GET, POST, PUT
Access-Control-Allow-Headers: X-Custom-Header
Content-Type: text/html; charset=utf-8

Access-Control-Allow-Origin (required) – Like the simple response, the preflight response must include this header.

Access-Control-Allow-Methods (required) – Comma-delimited list of the supported HTTP methods. Note that although the preflight request only asks permisions for a single HTTP method, this reponse header can include the list of all supported HTTP methods. This is helpful because the preflight response may be cached, so a single preflight response can contain details about multiple request types.

Access-Control-Allow-Headers (required if the request has an Access-Control-Request-Headers header) – Comma-delimited list of the supported request headers. Like the Access-Control-Allow-Methods header above, this can list all the headers supported by the server (not only the headers requested in the preflight request).

Access-Control-Allow-Credentials (optional) – Same as simple request.

Access-Control-Max-Age (optional) – Making a preflight request on *every* request becomes expensive, since the browser is making two requests for every client request. The value of this header allows the preflight response to be cached for a specified number of seconds.

Once the preflight request gives permissions, the browser makes the actual request. The actual request looks like the simple request, and the response should be processed in the same way:

Actual Request:

PUT /cors HTTP/1.1
Origin: http://api.bob.com
Host: api.alice.com
X-Custom-Header: value
Accept-Language: en-US
Connection: keep-alive
User-Agent: Mozilla/5.0...


Actual Response:

Access-Control-Allow-Origin: http://api.bob.com
Content-Type: text/html; charset=utf-8

If the server wants to deny the CORS request, it can just return a generic response (like HTTP 200), without any CORS header. The server may want to deny the request if the HTTP method or headers requested in the preflight are not valid. Since there are no CORS-specific headers in the response, the browser assumes the request is invalid, and doesn’t make the actual request:

Preflight Request:

Actual Response:

OPTIONS /cors HTTP/1.1
Origin: http://api.bob.com
Access-Control-Request-Method: PUT
Access-Control-Request-Headers: X-Custom-Header
Host: api.alice.com
Accept-Language: en-US
Connection: keep-alive
User-Agent: Mozilla/5.0...

Preflight Response:

// ERROR - No CORS headers, this is an invalid request!
Content-Type: text/html; charset=utf-8

If there is an error in the CORS request, the browser will fire the client's onerrorevent handler. It will also print the following error to the console log:

XMLHttpRequest cannot load http://api.alice.com. Origin http://api.bob.com is not allowed by Access-Control-Allow-Origin.

The browser doesn't give you a lot of details on why the error occurred, it only tells you that something went wrong.

While CORS lays the groundwork for making cross-domain requests, the CORS headers are not a substitute for sound security practices. You shouldn't rely on the CORS header for securing resources on your site. Use the CORS headers to give the browser directions on cross-domain access, but use some other security mechanism, such as cookies or OAuth2, if you need additional security restrictions on your content.

CORS from JQuery

JQuery's $.ajax() method can be used to make both regular XHR and CORS requests. A few notes about JQuery's implementation:

  • JQuery's CORS implementation doesn't support IE's XDomainRequest object. But there are JQuery plugins that enable this. See http://bugs.jquery.com/ticket/8283 for details.
  • The $.support.cors boolean will be set to true if the browser supports CORS (This returns false in IE, see bullet above). This can be a quick way to check for CORS support.

Here's sample code for making a CORS request with JQuery. The comments give more details on how certain properties interact with CORS.

$.ajax({

  // The 'type' property sets the HTTP method.
  // A value of 'PUT' or 'DELETE' will trigger a preflight request.
  type: 'GET',

  // The URL to make the request to.
  url: 'http://html5rocks-cors.s3-website-us-east-1.amazonaws.com/index.html',

  // The 'contentType' property sets the 'Content-Type' header.
  // The JQuery default for this property is
  // 'application/x-www-form-urlencoded; charset=UTF-8', which does not trigger
  // a preflight. If you set this value to anything other than
  // application/x-www-form-urlencoded, multipart/form-data, or text/plain,
  // you will trigger a preflight request.
  contentType: 'text/plain',

  xhrFields: {
    // The 'xhrFields' property sets additional fields on the XMLHttpRequest.
    // This can be used to set the 'withCredentials' property.
    // Set the value to 'true' if you'd like to pass cookies to the server.
    // If this is enabled, your server must respond with the header
    // 'Access-Control-Allow-Credentials: true'.
    withCredentials: false
  },

  headers: {
    // Set any custom headers here.
    // If you set any non-simple headers, your server must include these
    // headers in the 'Access-Control-Allow-Headers' response header.
  },

  success: function() {
    // Here's where you handle a successful response.
  },

  error: function() {
    // Here's where you handle an error response.
    // Note that if the error was due to a CORS issue,
    // this function will still fire, but there won't be any additional
    // information about the error.
  }
});


Fail Fast Vs Fail Safe Iterator In Java

Fail Fast Vs Fail Safe Iterator In Java : Java Developer Interview Questions

Difference between Fail fast and fail safe iterator  or  Fail fast vs Fail Safe iterator is one of those questions which are  used to test your knowledge about the topic Concurrency.
Before we discuss in detail about fail safe iterator and fail fast iterator in addition to  their comparison , we should understand the term Concurrent Modification .

What is Concurrent Modification ?

When one or more thread is iterating over the collection, in between, one thread changes the structure of the collection (either adding the element to the collection or by deleting the element in the collection or by updating the value at particular position in the collection) is known as Concurrent Modification

Difference between Fail Fast iterator and Fail Safe iterator

Fail fast Iterator

Fail fast iterator while iterating through the collection , instantly throws Concurrent Modification Exception if there is structural modification  of the collection . Thus, in the face of concurrent modification, the iterator fails quickly and cleanly, rather than risking arbitrary, non-deterministic behavior at an undetermined time in the future.

Fail-fast iterator can throw ConcurrentModificationException in two scenarios :

difference between fail fast iterator and fail safe iterator

Single Threaded Environment
 
After the creation of the iterator , structure is modified at any time by any method other than iterator’s own remove method.
 
Multiple Threaded Environment

If one thread is modifying the structure of the collection while other thread is iterating over it .

According to  Oracle docs , the fail-fast behavior of an iterator cannot be guaranteed as it is, generally speaking, impossible to make any hard guarantees in the presence of unsynchronized concurrent modification. Fail-fast iterators throw ConcurrentModificationException on a best-effort basis. Therefore, it would be wrong to write a program that depended on this exception for its correctness: the fail-fast behavior of iterators should be used only to detect bugs.

Interviewer : How  Fail  Fast Iterator  come to know that the internal structure is modified ?

Iterator read internal data structure (object array) directly . The internal data structure(i.e object array) should not be modified while iterating through the collection. To ensure this it maintains an internal  flag “mods” .Iterator checks the “mods” flag whenever it gets the next value (using hasNext() method and next() method). Value of mods flag changes whenever there is an structural modification. Thus indicating iterator to throw ConcurrentModificationException.

Fail Safe Iterator :

Fail Safe Iterator makes copy of the internal data structure (object array) and iterates over the copied data structure.Any structural modification done to the iterator affects the copied data structure.  So , original data structure remains  structurally unchanged .Hence , no ConcurrentModificationException throws by the fail safe iterator.

Two  issues associated with Fail Safe Iterator are :

1. Overhead of maintaining the copied data structure i.e memory.

2.  Fail safe iterator does not guarantee that the data being read is the data currently in the original data structure.

According to Oracle docs , fail safe iterator is ordinarily too costly, but may be more efficient than alternatives when traversal operations vastly outnumber mutations, and is useful when you cannot or don’t want to synchronize traversals, yet need to preclude interference among concurrent threads. The “snapshot” style iterator method uses a reference to the state of the array at the point that the iterator was created. This array never changes during the lifetime of the iterator, so interference is impossible and the iterator is guaranteed not to throw ConcurrentModificationException.The iterator will not reflect additions, removals, or changes to the list since the iterator was created. Element-changing operations on iterators themselves (remove(), set(), and add()) are not supported. These methods throw UnsupportedOperationException.

Example of Fail Fast Iterator and Fail Safe Iterator

public class FailFastExample
{

    public static void main(String[] args)
    {
        Map<String,String> premiumPhone = new HashMap<>();
        premiumPhone.put("Apple", "iPhone");
        premiumPhone.put("HTC", "HTC one");
        premiumPhone.put("Samsung","S5");

        Iterator iterator = premiumPhone.keySet().iterator();

        while (iterator.hasNext())
        {
            System.out.println(premiumPhone.get(iterator.next()));
            premiumPhone.put("Sony", "Xperia Z");
        }

    }
}
Output :
iPhone 
Exception in thread "main" java.util.ConcurrentModificationException at java.util.HashMap$HashIterator.nextEntry(Unknown Source) at java.util.HashMap$KeyIterator.next(Unknown Source) at FailFastExample.main(FailFastExample.java:20)&lt;/pre&gt;&lt;/div&gt;&lt;pre&gt;

Fail Safe Iterator Example :


public class FailSafeExample
{

    public static void main(String[] args)
    {
        ConcurrentHashMap<String,String> premiumPhone = new ConcurrentHashMap<>();
        premiumPhone.put("Apple", "iPhone");
        premiumPhone.put("HTC", "HTC one");
        premiumPhone.put("Samsung","S5");

        Iterator iterator = premiumPhone.keySet().iterator();

        while (iterator.hasNext())
        {
            System.out.println(premiumPhone.get(iterator.next()));
            premiumPhone.put("Sony", "Xperia Z");
        }

    }

}

Output :


HTC one
iPhone

Recap : Difference between Fail Fast Iterator and Fail Safe Iterator

Fail Fast Iterator Fail Safe Iterator
Throw ConcurrentModification Exception Yes No
Clone object No Yes
Memory Overhead No Yes
Examples HashMap,Vector,ArrayList,HashSet CopyOnWriteArrayList,
ConcurrentHashMap

source: http://javahungry.blogspot.com


Choosing an SSO Strategy: SAML vs OAuth2

By Zach Dennis on 09 May 2013

Chances are you’ve logged into an application (mobile app or web app) by clicking on a ‘Log in with Facebook’ button. If you use Spotify, Rdio, or Pinterest, then you know what I’m talking about.

As a user, you likely don’t care about how SSO works. You just want to use an application and can be thankful for a smoother experience and that you have to remember fewer logins and passwords.

In order to provide a user with a single sign on experience a developer needs to implement a SSO solution. Over the years there have been many attempts at achieving SSO, but this article is going to focus on a comparison between SAML and OAuth2 – a recent exploration that we took on (thankfully coming out the other end unscathed, but with a lot of information).

Our Need for SSO

We’re working on a platform which will have several client applications. Some of these applications will be web-based, others will be native, such as mobile apps.

This platform will roll out being accessible to a few different clients (owned by different organizations). Down the road, additional third-party applications are intended to be built around this platform.

The platform is a front end to a large enterprise system that already has identity information about the people who would be interacting with it. Rather than having each client application maintain their own user database with usernames and passwords, it seems more appropriate to utilize SSO.

Single sign on would allow the enterprise system to securely store and own all of the user credentials. The platform can establish a trust relationship with the enterprise authentication server and client applications can be built to utilize the trusted auth server to authenticate users.

Our goal was to identify an SSO strategy and implementation that could support these needs.

Enter SAML 2.0

We originally looked into SAML 2.0 which is a set of open standards, one of which is specifically designed for SSO.

The SAML 2.0 specification (henceforth SAML) provides a Web Browser SSO Profile which describes how single sign on can be achieved for web apps. There are three main players in SAML:

SAML and OAuth2 use similar terms for similar concepts. For comparison the formal SAML term is listed with the OAuth2 equivalent in parentheses.

  • Service Provider (Resource Server) – this is the web-server you are trying to access information on.
  • Client – this is how the user is interacting with the Resource Server, like a web app being served through a web browser.
  • Identity Provider (Authorization Server) – this is the server that owns the user identities and credentials. It’s who the user actually authenticates with.

The most common SAML flow is shown below:

SAML Web Browser SSO Profile flow

Here’s a fictitious scenario describing the above diagram:

  • A – a user opens their web-browser and goes to MyPhotos.com which stores all of their photos. MyPhotos.com doesn’t handle authentication itself.
  • B – to authenticate the user MyPhotos.com constructs a SAML Authnrequest, signs it, optionally encrypts it, and encodes it. After which, it redirects the user’s web browser to the Identidy Provider (IdP) in order to authenticate. The IdP receives the request, decodes it, decrypts it if necessary, and verifies the signature.
  • C – With a valid Authnrequest the IdP will present the user with a login form in which they can enter their username and password.
  • D– Once the user has logged in, the IdP generates a SAML token that includes identity information about the user (such as their username, email, etc). The Id takes the SAML token and redirects the user back to the Service Provider (MyPhotos.com).
  • E – MyPhotos.com verifies the SAML token, decrypts it if necessary, and extracts out identity information about the user, such as who they are and what their permissions might be. MyPhotos.com now logs the user into its system, presumably with some kind of cookie and session.

At the end of the process the user can interact with MyPhotos.com as a logged in user. The user’s credentials never passed through MyPhotos.com, only through the Identity Provider.

There is more detail to the above diagram, but this is high-level of what’s going on.

When first being introduced to SAML, the term “SAML token” came up over and over again. It’s not actually a term in the SAML spec, but people kept using it, and its meaning was elusive.

As it turns out, the term “SAML token” seems to be a colloquial way to refer to the SAML Assertion, often compressed, encoded, possibly encrypted, and it usually looks like gobbly-gook. And a SAML Assertion is just an XML node with certain elements.

SAML’s Native App Limitation

SAML supports the concepts of bindings. These are essentially the means by which the Identity Provider redirects the user back to the Service Provider. For example, in step D above, the user gets redirected back to the MyPhotos.com, but how?

The two relevant types of bindings are the HTTP Redirect and the HTTP POST binding defined in the SAML 2.0 spec. The HTTP Redirect binding will use a HTTP Redirect to send the user back to the Service Provider, in the case of our example: MyPhotos.com.

The HTTP Redirect binding is great for short SAML messages, but it is advised against using them for longer messages such as SAML assertions. From wikipedia:

Longer messages (e.g., those containing signed SAML assertions) should be transmitted via other bindings such as the HTTP POST Binding.

The recommended way of using an HTTP POST has its own oddities. For example, the SAML specification recommends that step D above renders an HTML form where the action points back to the Service Provider.

You can either have the user click another button to submit that form or you can utilize JavaScript to automate submitting the form. Why is there a form that needs to be submitted? In my opinon, SAML 2.0 is showing it’s age (circa 2005), as the form here only exists so an HTTP POST can be used to send the SAML token back to the Service Provider. Which to SAML’s defense, in 2005, was likely a necessary decision at the time.

This is a problem when the client is not a web-based application, but a native one, such as a mobile app. For example, let’s say we’ve installed the MyPhotos iPhone app. We open the app, and it wants us to authenticate against the Identity Provider. Once we authenticate, the Identity Provider needs to send the SAML token back to the MyPhotos app.

Most mobile applications can be launched via a custom URI, such as, “my-photos://authenticate”, and presumably, the Identity Provider submits the form that includes the SAML token to that URL. Our MyPhotos app launches, but we’re not logged in. What gives?

Mobile apps don’t have access to the HTTP POST body. They only have access to the URL use to launch the application. This means that we can’t read the SAML token.

On Android: launching an application from a url using Intents.

On iOS: launching an application by registering a custom URI scheme.

No SAML token, no authenticated user.

Working Around SAML’s HTTP POST Binding

The limitation of the HTTP POST binding for native mobile apps can be worked around. For example, you can use embedded web views, in which you write custom code to watch the entire authentication process. At the very end of the process you scrape the HTML of the page and extract out the SAML token.

A second workaround is to implement a proxy server which can receive the HTTP POST, extract the SAML token, and then make a URL that includes the SAML token (e.g.: “myphotos://authenticate/?SAMLRequest=asdfsdfsdf”) The proxy server could then use an HTTP Redirect to cause the device to open the MyPhotos app. And since the SAML token is a part of the URL the MyPhotos app can extract it, and use that to log in.

A third workaround would be to ignore the specification’s recommendation against using the HTTP Redirect binding. This is very tempting, but it’s hard to shake off the feeling that you’re walking into a mine-field, just hoping you don’t make one wrong step.

Another approach which avoided workarounds altogether is to not rely on SAML, but look at another approach, like OAuth 2.0.

Enter OAuth 2.0

Unlike SAML, OAuth 2.0 (henceforth OAuth2), is a specification whose ink has barely dried (circa late 2012). It has the benefit of being recent and takes into consideration how the world has changed in the past eight years.

Mobile devices and native applications are prevalent today in ways that SAML could not anticipate in 2005.

The basic players with OAuth2 are:

SAML and OAuth2 use similar terms for similar concepts. For comparison the formal OAuth2 term is listed with the SAML equivalent in parentheses.

  • Resource Server (Service Provider) – this is the web-server you are trying to access information on.
  • Client – this is how the user is interacting with the Resource Server. This could be a browser-based web app, a native mobile app, a desktop app, a server-side app.
  • Authorization Server (Identity Provider) – this is the server that owns the user identities and credentials. It’s who the user actually authenticates and authorizes with.

At a high level, the OAuth2 flow is not that different from the earlier SAML flow:

OAuth2 Protocol flow

Let’s walk through the same scenario we walked through with SAML earlier:

  • A – a user opens their web-browser and goes to MyPhotos.com which stores all of their photos. MyPhotos.com doesn’t handle authentication itself, so the user is redirected to the Authorization Server with a request for authorization. The user is presented with a login form and is asked if they want to approve the Resource Server (MyPhotos.com) to act on their behalf. The user logs in and they are redirected back to MyPhotos.com.
  • B – the client receives an authorization grant code as a part of the redirect and then passes this along to the client.
  • C – the Client then uses that authorization grant code to request an access token from the Authorization Server.
  • D – if the authorization grant code is valid, then the Authorization Server grants an access token. The access token is then used by the client to request resources from the Resource Server (MyPhotos.com).
  • E – MyPhotos.com receives the request for a resource and it receives the access token. In order to make sure it’s a valid access token it sends the token directly to the Authorization Server to validate. If valid, the Authorization Server sends back information about the user.
  • F – having validated the user’s request MyPhotos.com sends the requested resource back to the user.

This is the most common OAuth2 flow: the authorization code flow. OAuth2 provides three other flows (or what they call authorization grants) which work for slightly different scenarios, such as single page javascript apps, native mobile apps, native desktop apps, traditional web apps, and server-side applications where a user isn’t directly involved but they’ve granted you permission to do something on their behalf.

The big advantage with OAuth2 flows are that the communication from the Authorization Server back to the Client and Resource Server is done over HTTP Redirects with the token information provided as query parameters. OAuth2 also doesn’t assume the Client is a web-browser whereas the default SAML Web Browser SSO Profile does.

Native mobile applications will just work out of the box. No workarounds necessary.

OAuth2’s Favorite Phrase: Out of Scope

The OAuth2 specification doesn’t prescribe how the communication between the Resource Server and the Authorization Server works in a lot of situations, such as validating a token. It also doesn’t say anything about what information should be returned about the user or in what format.

There are quite a few spots where the OAuth2 specification states that things are “outside the scope of this specification.” This has brought criticism to the OAuth2 spec because it leaves a lot of things up to implementation which could lead to incompatible implementations at some point.

OAuth2, is still very young, and it already has widespread adoption with the likes of Google, Facebook, Salesforce, and Twitter to name a few. The true beauty of OAuth2 though is its simplicity. In fact, the OpenID Connect Basic Profile, which builds on OAuth2 fills in some of the areas that the OAuth2 spec itself doesn’t define.

OAuth2: Not Requiring Digital Signatures By Default

OAuth2 doesn’t require signing messages by default. If you want to add that in, feel free, but out of the box, the spec works without it. It does prescribe that all requests should be made over SSL/TLS.

This has caused commotion in the past:

Having worked with OAuth2 and OAuth1 in the past, I can say that OAuth2 is much simpler than OAuth1 (and more enjoyable to work with). Interoperability and automatic discovery of services may be something useful in the future, but right now, it’s not anything we’re looking for.

We may be asked to sign messages once the security team of the enterprise does final auditing of the OAuth2 implementation, but for now, OAuth2 fits our current goals in a more standardized manner than SAML. It’s also far simpler.

If every application has a secured web-server backing it then signing works great, but when that’s not the case the problem becomes more nuanced. How do you securely store your keys in the browser for browser-based JS apps or in native mobile apps?

If you google decompiling iOS and Android apps have your heart will sink. Your keys really aren’t that secure if you can’t own and secure the device.

OAuth2 is for Authorization, not Authentication

The “auth” in OAuth does stand for “Authorization” and not “Authentication”. The pedant in you may be smiling. You’ve got me!

But – yes, there’s always a but! Even though the term OAuth is fairly recent, the fact that “auth” meant authorization seems a tad bit anachronistic. It’s already being used to achieve SSO out in the wild (thanks to the likes of Facebook, Twitter, Salesforce, and Google and thousands of sites using them for authenticating and authorizing users).

The biggest complaint I’ve seen is in lack of prescription and the plentiful “out of scope” usages in the OAuth2 spec. The fact that the OpenID Connect Basic Profile is built directly on top of OAuth2 should be enough to dispel the myth that OAuth2 can’t be used for authentication.

What a word meant six years ago is much less important than what it can encompass today.

Summary

SAML has one feature that OAuth2 lacks: the SAML token contains the user identity information (because of signing). With OAuth2, you don’t get that out of the box, and instead, the Resource Server needs to make an additional round trip to validate the token with the Authorization Server.

On the other hand, with OAuth2 you can invalidate an access token on the Authorization Server, and disable it from further access to the Resource Server.

Both approaches have nice features and both will work for SSO. We have proved out both concepts in multiple languages and various kinds of applications. At the end of the day OAuth2 seems to be a better fit for our needs (since there isn’t an existing SAML infrastructure in place to utilize).

OAuth2 provides a simpler and more standardized solution which covers all of our current needs and avoids the use of workarounds for interoperability with native applications.

As this begins to unfold and we work with various security teams we’ll see how far this holds up.

So far, so good.

How to split a list into n equal parts

Suppose you want to split a into sub list of approximately equal size with specify parts.

public class CollectionUtils {

public static <T> List<List<T>> split(List<T> list, int numberOfParts) {
      List<List<T>> numberOfPartss = new ArrayList<>(numberOfParts);
      int size = list.size();
      int sizePernumberOfParts = (int) Math.ceil(((double) size) / numberOfParts);
      int leftElements = size;
      int i = 0;
      while (i < size && numberOfParts != 0) {
          numberOfPartss.add(list.subList(i, i + sizePernumberOfParts));
          i = i + sizePernumberOfParts;
          leftElements = leftElements - sizePernumberOfParts;
          sizePernumberOfParts = (int) Math.ceil(((double) leftElements) / --numberOfParts);
       }
       return numberOfPartss;
   }
}

How To Delay Javascript Loop

Old approach

This code is what most have come up with

for (var index = 1; index < 50; index++) {
    setTimeout(function() {
        console.log(index);
    }, 100);    
}

Now this prints “50” fifty times, because a for-loop is synchronous while setTimout is asynchronous. This means that the for-loop is finished very fast and has started 50 setTimeouts. After 100ms all of those setTimeout functions will fire together, therefore printing “50” fifty times. Note that the var-keyword binds variables to the function scope, not the current block scope like in other languages.

In order to create a for-loop with actual delay – in our case printing a number, waiting 100ms and printing the next number – you need to create a self-invoking, recursive function. Don’t worry, it’s not that hard.

<span class="kwd">var</span><span class="pln"> maxLoops </span><span class="pun">=</span> <span class="lit">50</span><span class="pun">;</span> <span class="kwd">var</span><span class="pln"> counter </span><span class="pun">=</span> <span class="lit">0</span><span class="pun">;</span> <span class="pun">(</span><span class="kwd">function</span> <span class="kwd">next</span><span class="pun">()</span> <span class="pun">{</span> <span class="kwd">if</span> <span class="pun">(</span><span class="pln">counter</span><span class="pun">++</span> <span class="pun">></span><span class="pln"> maxLoops</span><span class="pun">)</span> <span class="kwd">return</span><span class="pun">;</span><span class="pln"> setTimeout</span><span class="pun">(</span><span class="kwd">function</span><span class="pun">()</span> <span class="pun">{</span><span class="pln"> console</span><span class="pun">.</span><span class="pln">log</span><span class="pun">(</span><span class="pln">counter</span><span class="pun">);</span> <span class="kwd">next</span><span class="pun">();</span> <span class="pun">},</span> <span class="lit">100</span><span class="pun">);</span> <span class="pun">})();
</span>

Here we declare two variables, maxLoops and counter. These are for keeping track of how many times the function has called itself. Afterwards we create the function “next”, put it in brackets and call it immediately. This is why it’s called a self-invoking function.

The if-statement does two things. First of all it counts up our counter variable using the ++ operator. It also returns the function if it has been called 50 times, therefore stopping the loop.

The last part is the most important one. We create our setTimeout function and then call next() after the number has been printed. And that’s how you create a for-loop with delay in JavaScript.

New approach

While this post is still valid for ES5, I wanted to point out that there is now an easier method using async/await in the latest TypeScript 2.1.0 release. You can use this feature natively in the latest Node version, but TypeScript now allows you to compile async/await to ES5 for browsers.

You should still read the original post, especially if you found this blog entry while googling a similar problem.

<span class="kwd">
const</span><span class="pln"> delay </span><span class="pun">=</span> <span class="pun">(</span><span class="pln">amount</span><span class="pun">:</span><span class="pln"> number</span><span class="pun">)</span> <span class="pun">=></span> <span class="pun">{</span> <span class="kwd">return</span> <span class="kwd">new</span> <span class="typ">Promise</span><span class="pun">((</span><span class="pln">resolve</span><span class="pun">)</span> <span class="pun">=></span> <span class="pun">{</span><span class="pln"> setTimeout</span><span class="pun">(</span><span class="pln">resolve</span><span class="pun">,</span><span class="pln"> amount</span><span class="pun">);</span> <span class="pun">});</span> <span class="pun">};</span><span class="pln"> async </span><span class="kwd">function</span><span class="pln"> loop</span><span class="pun">()</span> <span class="pun">{</span> <span class="kwd">for</span> <span class="pun">(</span><span class="pln">let i </span><span class="pun">=</span> <span class="lit">0</span><span class="pun">;</span><span class="pln"> i </span><span class="pun"><</span> <span class="lit">50</span><span class="pun">;</span><span class="pln"> i</span><span class="pun">++)</span> <span class="pun">{</span><span class="pln"> console</span><span class="pun">.</span><span class="pln">log</span><span class="pun">(</span><span class="pln">i</span><span class="pun">);</span><span class="pln"> await delay</span><span class="pun">(</span><span class="lit">100</span><span class="pun">);</span> <span class="pun">}</span> <span class="pun">}
</span>


How to avoid Jar conflicts (Jar Hell) with container libraries

What is Jar hell?

Jar hell or classpath hell or dependency hell is a term used to describe all the various ways in which the classloading process can end up not working. It ends with this list of the different circles of JAR hell: unexpressed dependencies, transitive dependencies shadowing, version conflicts, complex class loading.

Simple solution

Overwrite jar file in container by your libraries. Simply, copy your libraries to folder container/lib or some kind like that.

Several pitfalls may occur:
• We have to do it every freaking time we deploy the project.
• Depending on the container, we have to know how to do it properly.
• If we get the bad luck that the version we prefer to use is not compatible with the container, we may get more problem at runtime.

Use maven-shade-plugin

A better way is shading them. maven-shade-plugin  provides the capability to package the artifact in an uber-jar, including its dependencies and to shade – i.e. rename – the packages of some of the dependencies.


How to do

For example, we have Google Guice  lib is conflicting with Container

Step 1

Create a new maven project, for example repacked and add conflict dependency.


</pre>
&lt;project&gt;
 &lt;groupId&gt;com.com.javacoffie&lt;/groupId&gt;
 &lt;artifactId&gt;repacked&lt;/artifactId&gt;

 &lt;version&gt;4.0&lt;/version&gt;

&lt;dependencies&gt;

 &lt;dependency&gt;
 &lt;groupId&gt;com.google.inject&lt;/groupId&gt;
 &lt;artifactId&gt;guice&lt;/artifactId&gt;
 &lt;version&gt;4.0&lt;/version&gt;
 &lt;/dependency&gt;
 &lt;/dependencies&gt;
&lt;/project&gt;
<pre>


Step 2 Configure shade plugin

</pre>
<build>
<plugins>
<plugin>
<groupId>org.apache.maven.plugins</groupId>
<artifactId>maven-shade-plugin</artifactId>
<version>2.4.3</version>
<configuration>
<artifactSet>
<includes>
<include>com.google.inject:guice</include>
<include>com.google.guava:guava</include>
</includes>
</artifactSet>
</configuration>
<executions>
<execution>
<phase>package</phase>
<goals>
<goal>shade</goal>
</goals>
<configuration>
<relocations>
-->
<relocation>
<pattern>com.google</pattern>
<shadedPattern>com.example.shaded.google</shadedPattern>
</relocation>
<relocation>
<pattern>com.google.thirdparty.publicsuffix</pattern>
<shadedPattern>com.axonivy.shaded.google.thirdparty.publicsuffix</shadedPattern>
</relocation>
</relocations>
</configuration>
</execution>
</executions>
</plugin>
</plugins>
</build>
<pre>

Step 4

Execute command


mvn clean install.

Step 5

Add new antifact as dependency to your project


<dependency>
<groupId>com.javacoffie</groupId>
<artifactId>repacked</artifactId>
<version>4.0</version>
</dependency>

Jquery ways to select elements

Select by exact id

<input id="myid"/> 
$("#myid")


Select by id ends with

If you want to select elements which id end with a given string

<input id="abcxyztxtTitle"/>
$("[id$='txtTitle']")


Select by id starts with

If you want to select elements which id starts with a given string

<input id="txtTitle:ssaaeweweww"/>


$("[id^='txtTitle']")

Select by id contains

If you want to select elements which id contains a given string

<input id="prefix:txtTitle:ssaaeweweww"/>
$("[id$='txtTitle']")
 

Select by id not contains

If you want to select elements which id contains a given string

<input id="noTitle:ssaaeweweww"/>


</pre>
<pre>$("[id!='txtTitle']")</pre>
<pre>


Select by id contains a given word, delimited by spaces

<input id="txtTitle  abc"/>


</pre>
<pre>$("[id~='txtTitle']")</pre>
<pre>

Select by id is equals to given String followed by hypen


<input id="txtTitle-en"/>

$("[id|='txtTitle']")


Software Design Principles

Software design principles represent a set of guidelines that helps us to avoid having a bad design.

The open –closed principle:

A module should be open for extension but closed for modification, can be extended, without requiring them to be modified. => able to change to module without changing source code, 2 ways:
a. Meyer’s Open/Closed Principle: the first principle, implementation of a class could only be modified to correct errors; new or changed features would require that a different class be created
b. Polymorphic Open/Closed Principle: the implementations can be changed and multiple implementations could be created and polymorphically substituted for each other.

The Liskov Substitution Principle

Subclasses should be substitutable for their base classes. Derived classes should be substitutable for their base classes. That is, a user of a base class should continue to function properly if a derivative of that base class is passed to it.

Dependency Inversion Principle

Depend upon Abstractions. Do not depend upon concretions, Dependency Inversion is the strategy of depending upon interfaces or abstract functions and classes, rather than upon concrete functions and classes.

The Interface Segregation Principle:

Many client specific interfaces are better than one general purpose interface. The essence of the principle is quite simple. If you have a class that has several clients, rather than loading the class with all the methods that the clients need, create specific interfaces for each client and multiply inherit them into the class.

Release Reuse Equivalency Principle

The unit of reuse is the unit of release. Effective reuse requires tracking of releases from a change control system. The package is the effective unit of reuse and release.

Common Reuse Principle

Classes that aren’t reused together should not be grouped together.

Stable Dependencies Principle

depend on the direction of stability

Information hiding and encapsulation

Information hiding is the principle of segregation of design decisions

Low coupling

Coupling is a measure of how strongly one element is connected to, has knowledge of, or relies on other elements, Clear boundaries between tiers, program against interfaces, not classes.

High Cohesion

High Cohesion attempts to keep objects appropriately focused, manageable and understandable. High Cohesion is generally used in support of Low Coupling, High cohesion means that the responsibilities of a given element are strongly related and highly focused.

The Acyclic Dependencies Principle

The dependencies between packages must not form cycles.